Take a screenshot on your Lenovo laptop is a quick and easy way to capture everything on your screen. If you’re saving an important document, sharing a funny moment from a game, or troubleshooting an issue, knowing how to take a screenshot is a valuable skill. Lenovo laptops offer several ways to capture exactly what you need, and it’s important to know which method works best for you.
The good news is, you don’t need to be a tech expert to take a screenshot! This guide is designed to be beginner-friendly, so you can easily follow along and capture what’s on your screen. If you’re looking to grab the entire screen, just a specific window, or a custom area, we’ve got you covered.
In this guide, you’ll find easy-to-follow instructions for various methods of taking screenshots on your Lenovo laptop. Each method is explained step-by-step, so you can capture your screen in no time. We’ll walk you through everything—from simple shortcuts to more advanced tools—so you can choose the method that works best for your needs.
Related: Lenovo ThinkPad E16 Gen 1 Business Laptop Review
1. Full-Screen Screenshot (Captures the Entire Screen)
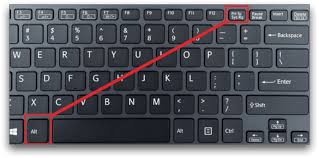
- Locate the “Print Screen” (PrtSc) key on your keyboard. It’s typically found in the top-right corner of your keyboard, near the function keys (F1, F2, etc.).
- Press the “Windows key” + “PrtSc” key simultaneously.
- The Windows key is on the bottom-left of your keyboard, often next to the Alt key, and has a small Windows logo.
- Wait for the screen to dim briefly. This indicates that the screenshot has been captured successfully.
- Find your screenshot in the Pictures folder.
- Open This PC and click on Pictures.
- Look for a subfolder named Screenshots.
- Access your screenshot. It will be saved as a PNG file, usually named Screenshot (1).png or similar. The number will increase (Screenshot (2), Screenshot (3), etc.) with every new screenshot you take.

2. Copy and Paste Screenshot (Quick and Simple)
- Press the “PrtSc” key. This will copy your entire screen to the clipboard.
- Open Paint.
- Click on the Start menu, type “Paint” into the search bar, and open the Paint app from the results.
- Paste the screenshot.
- In Paint, press Ctrl + V on your keyboard to paste the screenshot that you copied.
- Save your screenshot.
- Click File at the top left, then select Save As.
- Choose where to save the file, such as your Desktop or another folder.
- Name your file and click Save.
3. Active Window Screenshot (Capture Only the Active Window)
- Click on the window you want to capture. This should be the active window (e.g., a browser or an app).
- Press “Alt + PrtSc” together.
- This will capture only the window you are focused on, not the entire screen.
- Open Paint.
- If Paint is not already open, search for it in the Start menu and click to open it.
- Paste the screenshot.
- Press Ctrl + V to paste the screenshot into Paint.
- Save the screenshot.
- Click File and then Save As to choose a location to save the screenshot. Give it a name and click Save.
Related: Best laptops with number pads 2024
4. Custom Area Screenshot (Select a Specific Area to Capture)

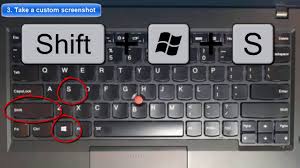
- Press “Windows + Shift + S” together.
- This opens the Snip & Sketch tool, and your screen will dim.
- Select the area to capture.
- Your cursor will change to a cross. Click and drag over the area you want to capture. Release the mouse button when you’re done.
- Paste the screenshot into an app like Paint.
- Open Paint (or any other app), and press Ctrl + V to paste the screenshot from the clipboard.
- Save the screenshot.
- Once pasted, click File and Save As to select the location and file name. Then click Save.
5. Using Snipping Tool (For More Control Over Your Screenshot)
- Search for “Snipping Tool” in the Start menu.
- Type “Snipping Tool” into the search bar and click on the app from the results to open it.
- Click “New”.
- Your screen will freeze and allow you to select the area you want to capture.
- Select the area to capture.
- Use your cursor to select the specific area on your screen that you want to capture.
- Save the screenshot.
- After capturing, click the floppy disk icon in the Snipping Tool to save your screenshot.
- Choose where to save it, name the file, and click Save.
Conclusion
Taking screenshots on a Lenovo laptop is easy and straightforward. Whether you need to capture the entire screen, just an active window, or a custom area, Lenovo laptops offer several ways to do so. The methods outlined above—Full-Screen Screenshot, Copy and Paste, Active Window Screenshot, Custom Area Screenshot, and the Snipping Tool—give you flexibility depending on the situation. Each method is designed to meet different needs, from quick captures to more precise selections.
Practicing these methods will make you more efficient at taking screenshots and help you save important moments, troubleshoot issues, or share content quickly. No matter your level of experience, taking screenshots on your Lenovo laptop can become second nature. Now that you know how to capture what’s on your screen, you can make use of these tools to keep, share, and organize your digital information.
FAQs
Q1: Where can I find my screenshots after taking them?
A1: By default, screenshots taken using the Windows key + PrtSc method are saved in the Screenshots folder inside your Pictures folder. You can also save them anywhere you choose if using methods like Copy and Paste.
Q2: Can I take a screenshot of just part of my screen on a Lenovo laptop?
A2: Yes! Use the Windows + Shift + S shortcut to capture a custom area. Your cursor will change to a cross, and you can select the specific area you want to screenshot.
Q3: How do I capture only the active window on my Lenovo laptop?
A3: To capture just one active window, press Alt + PrtSc. This will take a screenshot of only the window that’s currently in focus.
Q4: What is the Snipping Tool, and how is it different from other methods?
A4: The Snipping Tool allows you to capture a freeform, rectangular, or full-screen screenshot. It gives you more control over the area you want to capture compared to other methods, making it ideal for precise screenshots.
Q5: Are there any keyboard shortcuts for taking screenshots on Lenovo laptops?
A5: Yes, here are the main keyboard shortcuts:
- Windows + PrtSc: Full-screen screenshot.
- PrtSc: Copies the whole screen to the clipboard.
- Alt + PrtSc: Captures the active window.
- Windows + Shift + S: Custom area screenshot.

