

Have you ever faced a situation where you just sit down at your desk, ready to work, only to realize everything—your taskbar, your icons—is stuck on the wrong monitor? Frustrating, right? Well, it happened to me too–quite often actually.
I’d constantly drag windows across screens, struggling to figure out which monitor was “main.” Then, I discovered how easy it was to change that.
Believe it or not—it was just a matter of a few clicks and I successfully switched my primary display.
My taskbar and apps moved to the screen I actually use. No matter if you use Windows, Mac, or Chromebook, it’s such a simple fix. And trust me, once you make that change, it feels like your whole setup finally makes sense.
So if you’re tired of playing the guessing game with your monitors, then keep on reading this guide. Here, I have mentioned some of the simplest tips and tricks about how to change main monitor. So, keep scrolling.
Also Read More: How To Transfer Photos from iPhone To PC?
How To Change Main Monitor Windows 10?
Here are the simple and basic steps on how you can change the main monitor in Windows 10 easily without any trouble:
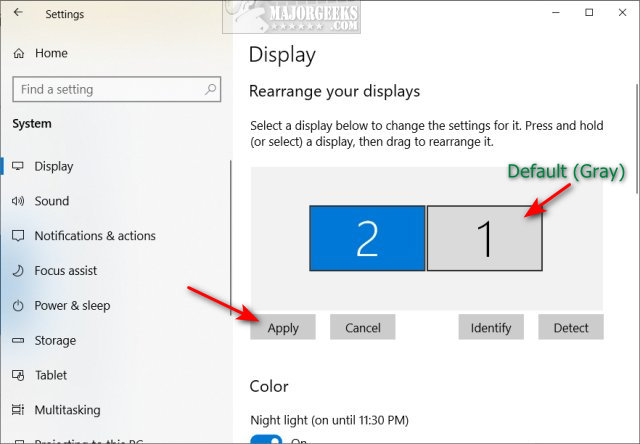
Step 1- Right-click on the desktop and select Display Settings. In the display settings window, you will see your monitors are represented by numbered boxes.
Step 2- If you need clarification on which monitor is which, click Identify and you’ll have numbers pop up on the monitors for identification purposes.
Step 3- Next, Click on the number of the monitor you want to make your main display. Now, scroll down to find the box stating “Make this my main display”. Check the box, and your desktop icons and taskbar will immediately move to the selected monitor.
Step 4- Finally, click on the Apply button to confirm your changes. It is easy to shift your main working area to another monitor.
How To Change Main Monitor Windows 11?
In Windows 11, it is very similar but has slight interface differences.
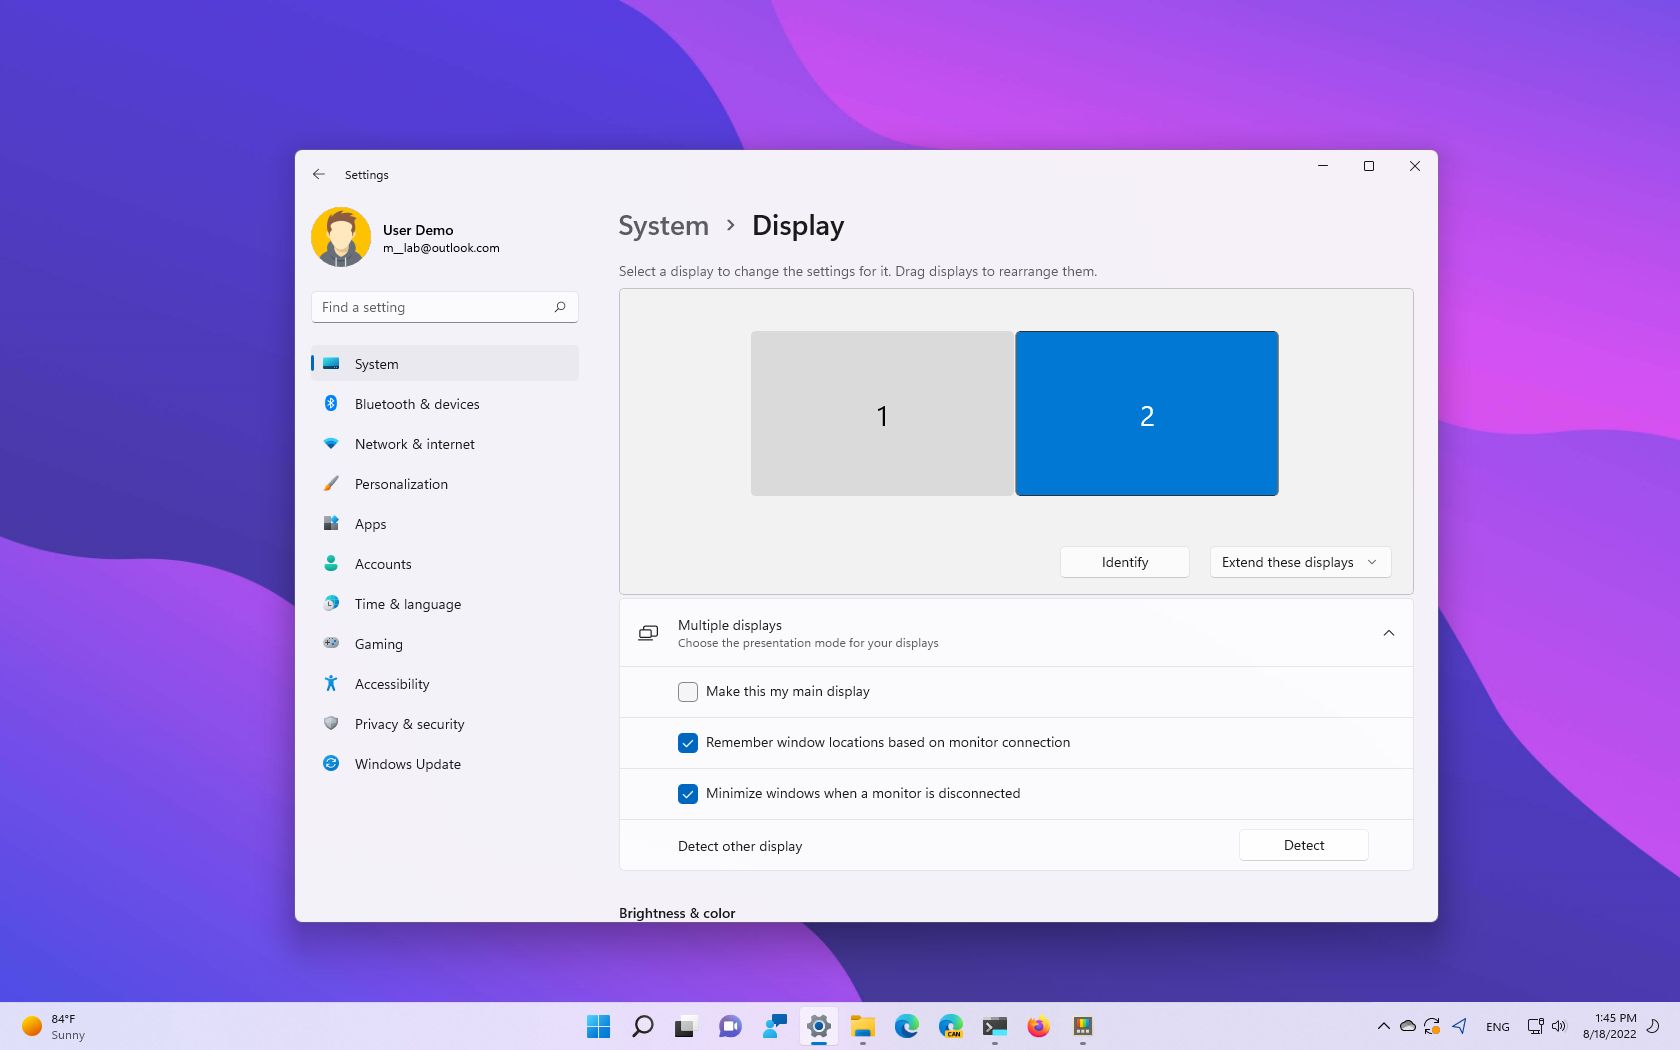
Step 1- First Right-click on the desktop and then select Display settings. This will open the systems section in the Settings application. Here, again, you will see an image of your displays, and the Identify button can help identify them.
Step 2- Once you locate the monitor that you want to designate as your main, click on that, scroll down, and find Make this my main display.
Step 3- Now, check that box designates the monitor as your main one, and then your taskbar and primary workspace will move over to that monitor.
Step 4- Click on the Apply button to change the resolution and orientation to improve your display setup.
How To Change The Main Monitor On a MacBook?
Here’s how you can change the primary display on a MacBook, broken down into steps:
Step 1– From the upper left corner of your screen, go to the Apple menu, and click on System Preferences.
Step 2– In the System Preferences window, click on Displays. At the top of the window, click the Arrangement tab to see a graphical layout of all connected monitors.
Step 3- Highlight the Main Display, a white bar on top of one of the monitor icons indicates the menu bar at the top of the current main display.
Step 4– Switch the Main Display To switch the main display, drag the white bar from one of the monitor icons where it currently is to a different monitor icon. It will immediately become its new main display.
Step 5– Your dock and menu bar will now appear on the new monitor you selected as your main workspace.
How To Change The Monitor on Chromebook?
Here are the simple and basic steps on how you can change the main monitor on a Chromebook easily without any trouble:
Step 1- Click on the time in the bottom-right corner of your screen and select the gear icon to open Settings. In the Settings menu, scroll down and click on Device, then select Displays.
Step 2- If you need clarification on which monitor is which, you will see your monitors represented by numbered boxes.
Step 3- Click on the number of the monitor you want to make your main display. Look for the option that says Make this my main display and check the box. Your taskbar and desktop icons will immediately move to the selected monitor.
Step 4- Your changes will update automatically, so there’s no need to click a separate apply button. It is easy to shift your main working area to another monitor on your Chromebook.
Conclusion
And that’s it—changing your main monitor is as easy as flipping a switch! Now, you’ve got the power to choose which screen gets center stage. It’s quick, simple, and surprisingly fun once you see everything shift over like magic.
So, go ahead and give it a try. Who knew controlling your workspace could feel this satisfying? Now, if only moving furniture was this easy
Frequently Asked Questions (FAQs)
What is the difference between the “main display” and “Display 1”?
The “main display” is the primary screen where your taskbar and desktop icons appear. Whereas, “Display 1” is simply a designation assigned by Windows based on the order in which monitors are detected during setup. Remember, the main display can be either Display 1 or any other display you choose.
How does Windows determine the numbering of monitors?
Windows assigns numbers to monitors based on the order they are detected upon booting. However, this order does not necessarily reflect their physical arrangement on your desk. Thus, you can effortlessly rearrange them in the Display Settings to match their actual positions.
Can I change which monitor is the main display?
Yes. You can change your main display—all you need to do is right-click on the desktop, select Display settings, choose the monitor you want to set as the main display and check the box that says Make this my main display.
What happens if I change the main display?
If you change your main display, then it will your taskbar, desktop icons, and any open windows to the selected monitor. This way you can conveniently work in different working areas according to your work needs.
How can I identify which monitor is which in Windows?
In the Display settings, click on the Identify button to see the number of each monitor on the screen. This helps you better understand the display arrangement, for instance, which one is Display 1, Display 2, etc.
What if my monitors are not arranged as I expected?
You can rearrange the monitors in the Display settings by dragging them to match their physical arrangement. This way, the cursor will move logically between displays as you expect.
Does the position of the monitor matter in Windows settings?
All while Windows does not inherently understand the physical position of your monitors, you can set their logical positions in the Display settings. It is essential to match their arrangement to improve your workflow.
Why can’t I see my external monitor in Windows?
If your external monitor is not detected, ensure that it is properly connected to your computer. You may also need to press the appropriate function key (like F4 or F8) on your keyboard to switch displays or enable the external monitor.